Even being clearly adapted to a colored style, I really like Zakka.
It’s not that it defines me as an artist, but I really admire the style and like the touch of another in my pieces.
One of my last acquisitions was the book Zakka Style, compiled by Rashida Coleman - Hale who reunited in his new book, a portion of talented people.
The book is a delight, filled with 24 super cute projects and inspiring photos!
There are projects with various purposes. All made with that sweet simplicity that only Zakka can do.
I really liked the project of Larissa Holland. A really cool method to produce this Messenger Bag.
I finished using the project idea and made my own version! =)
The flap was not made the way it was proposed in the book.
I made a Chevron with neutral fabrics. Ah, I was happy with the result! =)
This messenger is already available in my Etsy Shop.
Now the delight is that you can win an example of the book "Zakka Style"!!!
It is very simple to participate, the more entries you have, the more chances you have of winning!!!
Good luck!!! =)
a Rafflecopter giveaway
Pin It

Needless to say that I don’t iron clothes.
After
I opened my eyes to the quantity of time and energy (electrical and
physical) spent during this activity, I simply gave up being the perfect
wife!
I have an ironing board, but I only use it in the studio to iron my dear cloths!
Only
one ironing board is difficult in my life and for the students of the
studio, so how to provide more boards was an urgent question.
But where to put it?
I thought to buy that wall model, but I was discouraged seeing the price and in the end, it would not be so useful.
So then it was the moment to create my own ironing board.
I
made two small boards from my table, but if you liked the idea you can
make it in the size of your necessity and for the space that you have.
If you have a mega workbench, can you imagine a giant board for you to finish all of your ironing?
The
tutorial is more a tip than a list of instruction because it’s
something that you can make in 5 minutes. I took 10 minutes to make
these two boards.
Ah
and in economic terms, it is incredible, you use shreds (what I always
talk about not throwing in the garbage) and spend almost nothing.
Let’s go!!!!
Material:
-MDF board (as desired)
-A piece of quilt batting to cover the wood
-100% cotton fabric for the top
-Upholstering stapler with staples
-Scissors

The wood was the only thing that gave me work because it had to go to DIY shop (which is super close to my house) and aks the nice boy to cut in the middle for me. It took secondd to cut the wood!
Guys, what's that wood cutting machine?! I want one!
Now that the wood is cut, you only have to cut the blanket to be a bit larger in size (as the photo).
Start folding the blanket (you don’t need to fold the corners as in the photo but it’s totally neat)
With the stapler you’re going to secure the blanket all around the board.
First step finished? Now you are only to repeat what you just did with the wood and blanket, using the fabric that you chose!
You blinked and when looked again, the board was already finished and beautiful!
I made mine the size of the cutting mat, now I can put the two together on the table!
To open the seams now is the only joy in my beautiful boards, many sighs in this moment! ^_ ^
Important Notes:
-I spent USD$6 on the two MDF boards
-You can put two quilt batting on your board if the was very thin. You can also use an old bathroom towel, it’s good too!
-The
stapler is super easy to find in specialty stores or arts ‘n crafts stores. You can also buy online for a good price. I
paid USD$12 for the stapler and 200 staples. Now I can staple
the whole house, the kids and much more!LOL
-After everything is finished, you’ll have a desire to go crazy ironing clothes...ok! no way!!! hahahahah
Pin It
It’s porridge season here at home.
The children wait for the cold days to ask for porridge, in any flavor.
And these days I discovered a new use for corn starch, my best friend during the cold porridge days.
A few weeks ago I fell in the street and since then I can’t sit for too long or else I feel so much pain.
Sewing is now a challenge.
I have made things for the children, for me, and for the house. In general, I don’t have time for silly, pleasurable, and unnecessary little things, because my life is always rushed. But as I don’t have a choice, I am in continuing in another pace, more tranquil and less physical.
During these days, I thought about making a tree in the children’s room. I always wanted to buy those lovely adhesives, but they are so expensive. With so many fabrics in this house I refuse to spend a cent!
I found this tutorial and it inspired me since corn starch doesn’t lack at home and there are beautiful colored fabrics all around. =)
A little recipe for the starch:
-3 teaspoons of corn starch
-2 tablespoons of cold water
Just mix the two in a bowl and after put one cup of hot water, stir and leave to cool.
I found it very simple, the whole job. The result was super cool!
Some notes, if you would like to be adventurous and use this technique:
-A lot can be done with a recipe, but a single one is more than enough.
-A damp cloth close by is going to help a lot with cleaning the area and wall (excess of glue)
-The fact of only using corn starch with water is brilliant for whoever has children or pets.
-Use a lot of glue, soak each piece of fabric with it. My tree lost the four last leaves and when I couldn’t stand reattaching them over and over again, I used a little glue.
-Since it’s easily removable, if you are the changeable type or you live in a rented home, it’s the perfect project. Just rub off the fabric with clean damp cloth.
-Large pieces should really be cut, to make life easier!
-I made it in two days. In the end, I had to make more glue and apply some leaves that were falling off. It felt nice to finally finish.
-My tree took two days to be totally dry.
The kids love the tree. They participated in the choice of fabrics, glued various leaves, and enjoyed themselves very much.
Regardless of the tree, cloth, and porridge, the coolest part was making the tree with them.
Cool project for the winter holidays! ;D
Pin It
Nowadays, my body forces me to slow down.
I was always considered “Allegro con fuoco”, now I have to accept the title “Adagio”
Since my fall, I reduced my pace and it definitely hasn’t made me suffer.
Instead, I am realizing other things that I have never noticed. All those small details...
Making
a quilt demands this current pace. A lot of peace and tranquility is
needed to have an end result leaving you happy and hearing your daughter
say “awesome!”
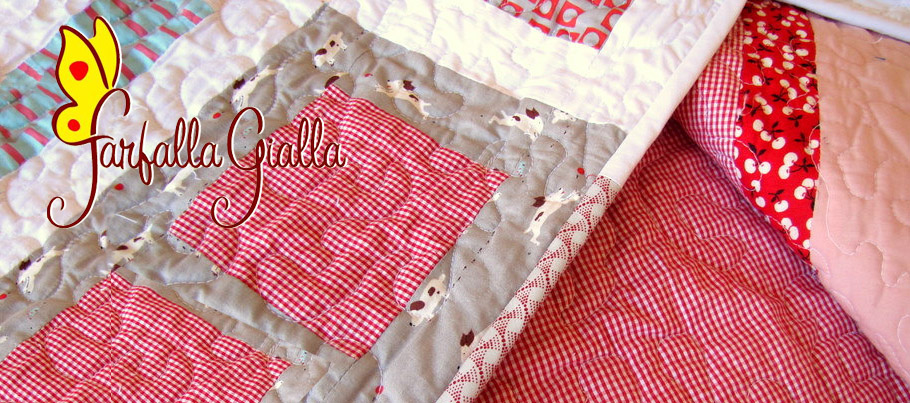
I finished this quilt on the weekend. I quilted with calmness and put the bindings on even more calmly!
The result: peace and tranquility, maybe a consequence from the white color.
The happiness? Probably from the small colored squares...
But now I see clearly. I had to fall, to hurt myself to see that the rhythm was wrong.
It’s life giving me a new chance...
I quilted without rushing and enjoying each detail of the production!
My
new quilt is already available in the store. It is a super cute baby
quilt, perfect to give as a gift for that baby in your heart.
Slowly, but always...making quilts...
Pin It
Organizing the photos for this post is what gave me an idea of how much time it took to finish this job.
My quilt, using these dear fabrics, was ready at last!
Bought in July of last year, my favorite fabrics of the collection, Sherbet Pips by Aneela Hoey, weren’t touched for a good amount of time.
Difficult to cut, get it?
Aneela Hoey is a brilliant artist that I have followed for a long time. When she announced that Moda would make fabrics with her illustration, I almost went crazy.
I already made a quilt with Little Apples, but my desire is definitely to have every fabric from Aneela.
Not to mention the embroidery patterns ! Oh my!
I finally got the courage to choose a simple pattern (Small Plates by Elizabeth Hartman)
that wouldn’t “shred” the print. I cut the pieces of fabric, but it’s
still possible to see the girl’s head and the dog’s tail! hahahaha
I joined other dear prints together and was assembling the work without rushing.
And it was during this job that I used the free quilting of my Horizon for the first time and it didn’t disappoint. The machine was worth every cent!
I worked a plaid print in the lining, a pale pink color on the top part of the quilt and put a strip of patterned pieces.
I think that I gave a great sweetness with this rose color and small plaid print!
It took days and days to hand stitch the binding, but it’s a thing that I love to do! I even had helpers. ^_ ^
I am extremely happy with the result, after all with fabric this beautiful it is easy to keep the job enjoyable! =)
My new quilt is already available in my Etsy Shop.
So cute, made with a lot of care and all the poetry of Aneela Hoey’s prints.
Pin It
I
freak out when I see cloth in the garbage. You can call me crazy, but I
don’t care! People that sew and have a serious business with quilts can
see in each snip of cloth, a world of possibilities.
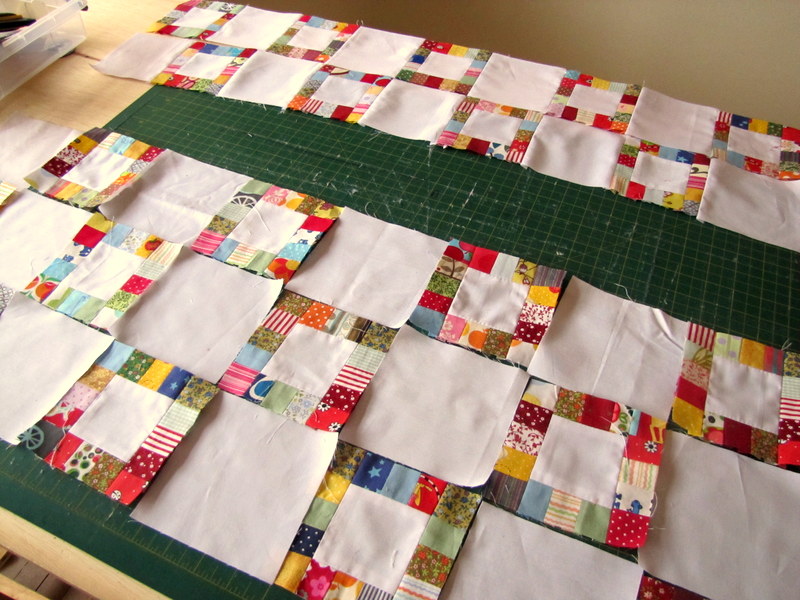
Many scraps, in this cold weather and with help from my Bernardo, began the process of this baby quilt on the weekend.
It’s still an unfinished job, but I think that I will quilt today due to the rain.
Guys, how about my son’s idea to put the strips together? He has potential! ;D
After to trim the blocks, it was very hard to throw the remains
in the garbage....But it’s impossible it use them any more! =(
I
was wanting to make this project for a long time, but it only happened
now! It’s a very popular pattern in the modern world. I made some
alterations of size and liked the result!
And the last step, which might be boring, made a big difference...a very hot iron!
White or colored cotton really keeps life warm, don’t you agree?!
Pin It
Nina has proved to be a very demanding client and a model full of personality.
She
picks the fabrics, poses in the photos and enjoys herself with me, her
personal stylist. I’ve enjoyed my free time (rarely) each day to make
clothes for Nina.
She picked the fabric full of flowers to her dress. I was forced to buy endless meters of the so called Fernando Maluhy fabric, which is beautiful and soft.
I chose one of the projects from Liesl Gibson, my favourite children’s clothing designer!
Its loose fit makes it perfect for playtime, while its light cloth makes it perfect as a summer dress!
And
Nina enjoys watching the clothing production and trying on clothes. At
the time of the photo shoots, she is one very serious model!
And we have fun this way: gathering fabric scraps, scratching paper with colored chalk.
She’s getting bigger and I’m loving every little moment of this.
Pin It